Marketing Consents
Marketing consents form the legal foundation of your email and SMS campaigns. Backend integration ensures these consents are accurately tracked, legally compliant, and synchronized across systems.
Why backend integration matters
Frontend tracking captures opt-in interactions, but backend integration provides:
- Legal compliance — GDPR and CAN-SPAM require auditable consent records with timestamps
- Authoritative data — Server-side records override frontend captures when conflicts occur
- Bidirectional sync — Consent changes in User.com (unsubscribes, pop-up opt-ins) flow back to your system
Without backend integration, you're relying on frontend JavaScript that can be blocked, modified, or lost.
Prerequisites
Before implementing consent tracking:
- Contact creation strategy — Decide when to create User.com contacts (see Contact registrations)
- User.com API key — With write access to contacts and events
- User ID strategy — Defined in Key decisions → Decide on User ID
- Consent fields — Created in User.com (e.g.,
email_consent,sms_consent) - Double Opt-In strategy — Decided (see below)
Choose your Double Opt-In strategy
Double Opt-In is the gold standard for marketing consent—contacts must actively confirm their subscription via email before receiving marketing communications. However, not every consent change requires Double Opt-In.
When to use Double Opt-In vs direct consent
Decide for each consent source whether to require Double Opt-In confirmation or update consent directly:
| Consent source | Recommendation | Rationale |
|---|---|---|
| Newsletter forms (footer, popups) | Double Opt-In | Anonymous submissions are prone to abuse; confirmation verifies email ownership |
| Account settings | Direct consent | Contact is already authenticated; no need to re-verify email |
| Registration form | Depends | If email is verified during registration, direct consent may suffice; otherwise Double Opt-In is safer |
| Checkout | Depends | Varies by implementation and legal requirements; transactional context may justify direct consent |
Rule of thumb: Use Double Opt-In when you can't verify the person submitting the form actually owns the email address. Use direct consent when the contact is already authenticated or their email is verified through another mechanism.
Who handles Double Opt-In?
Once you've decided which consent sources require Double Opt-In, choose which system handles the confirmation process:
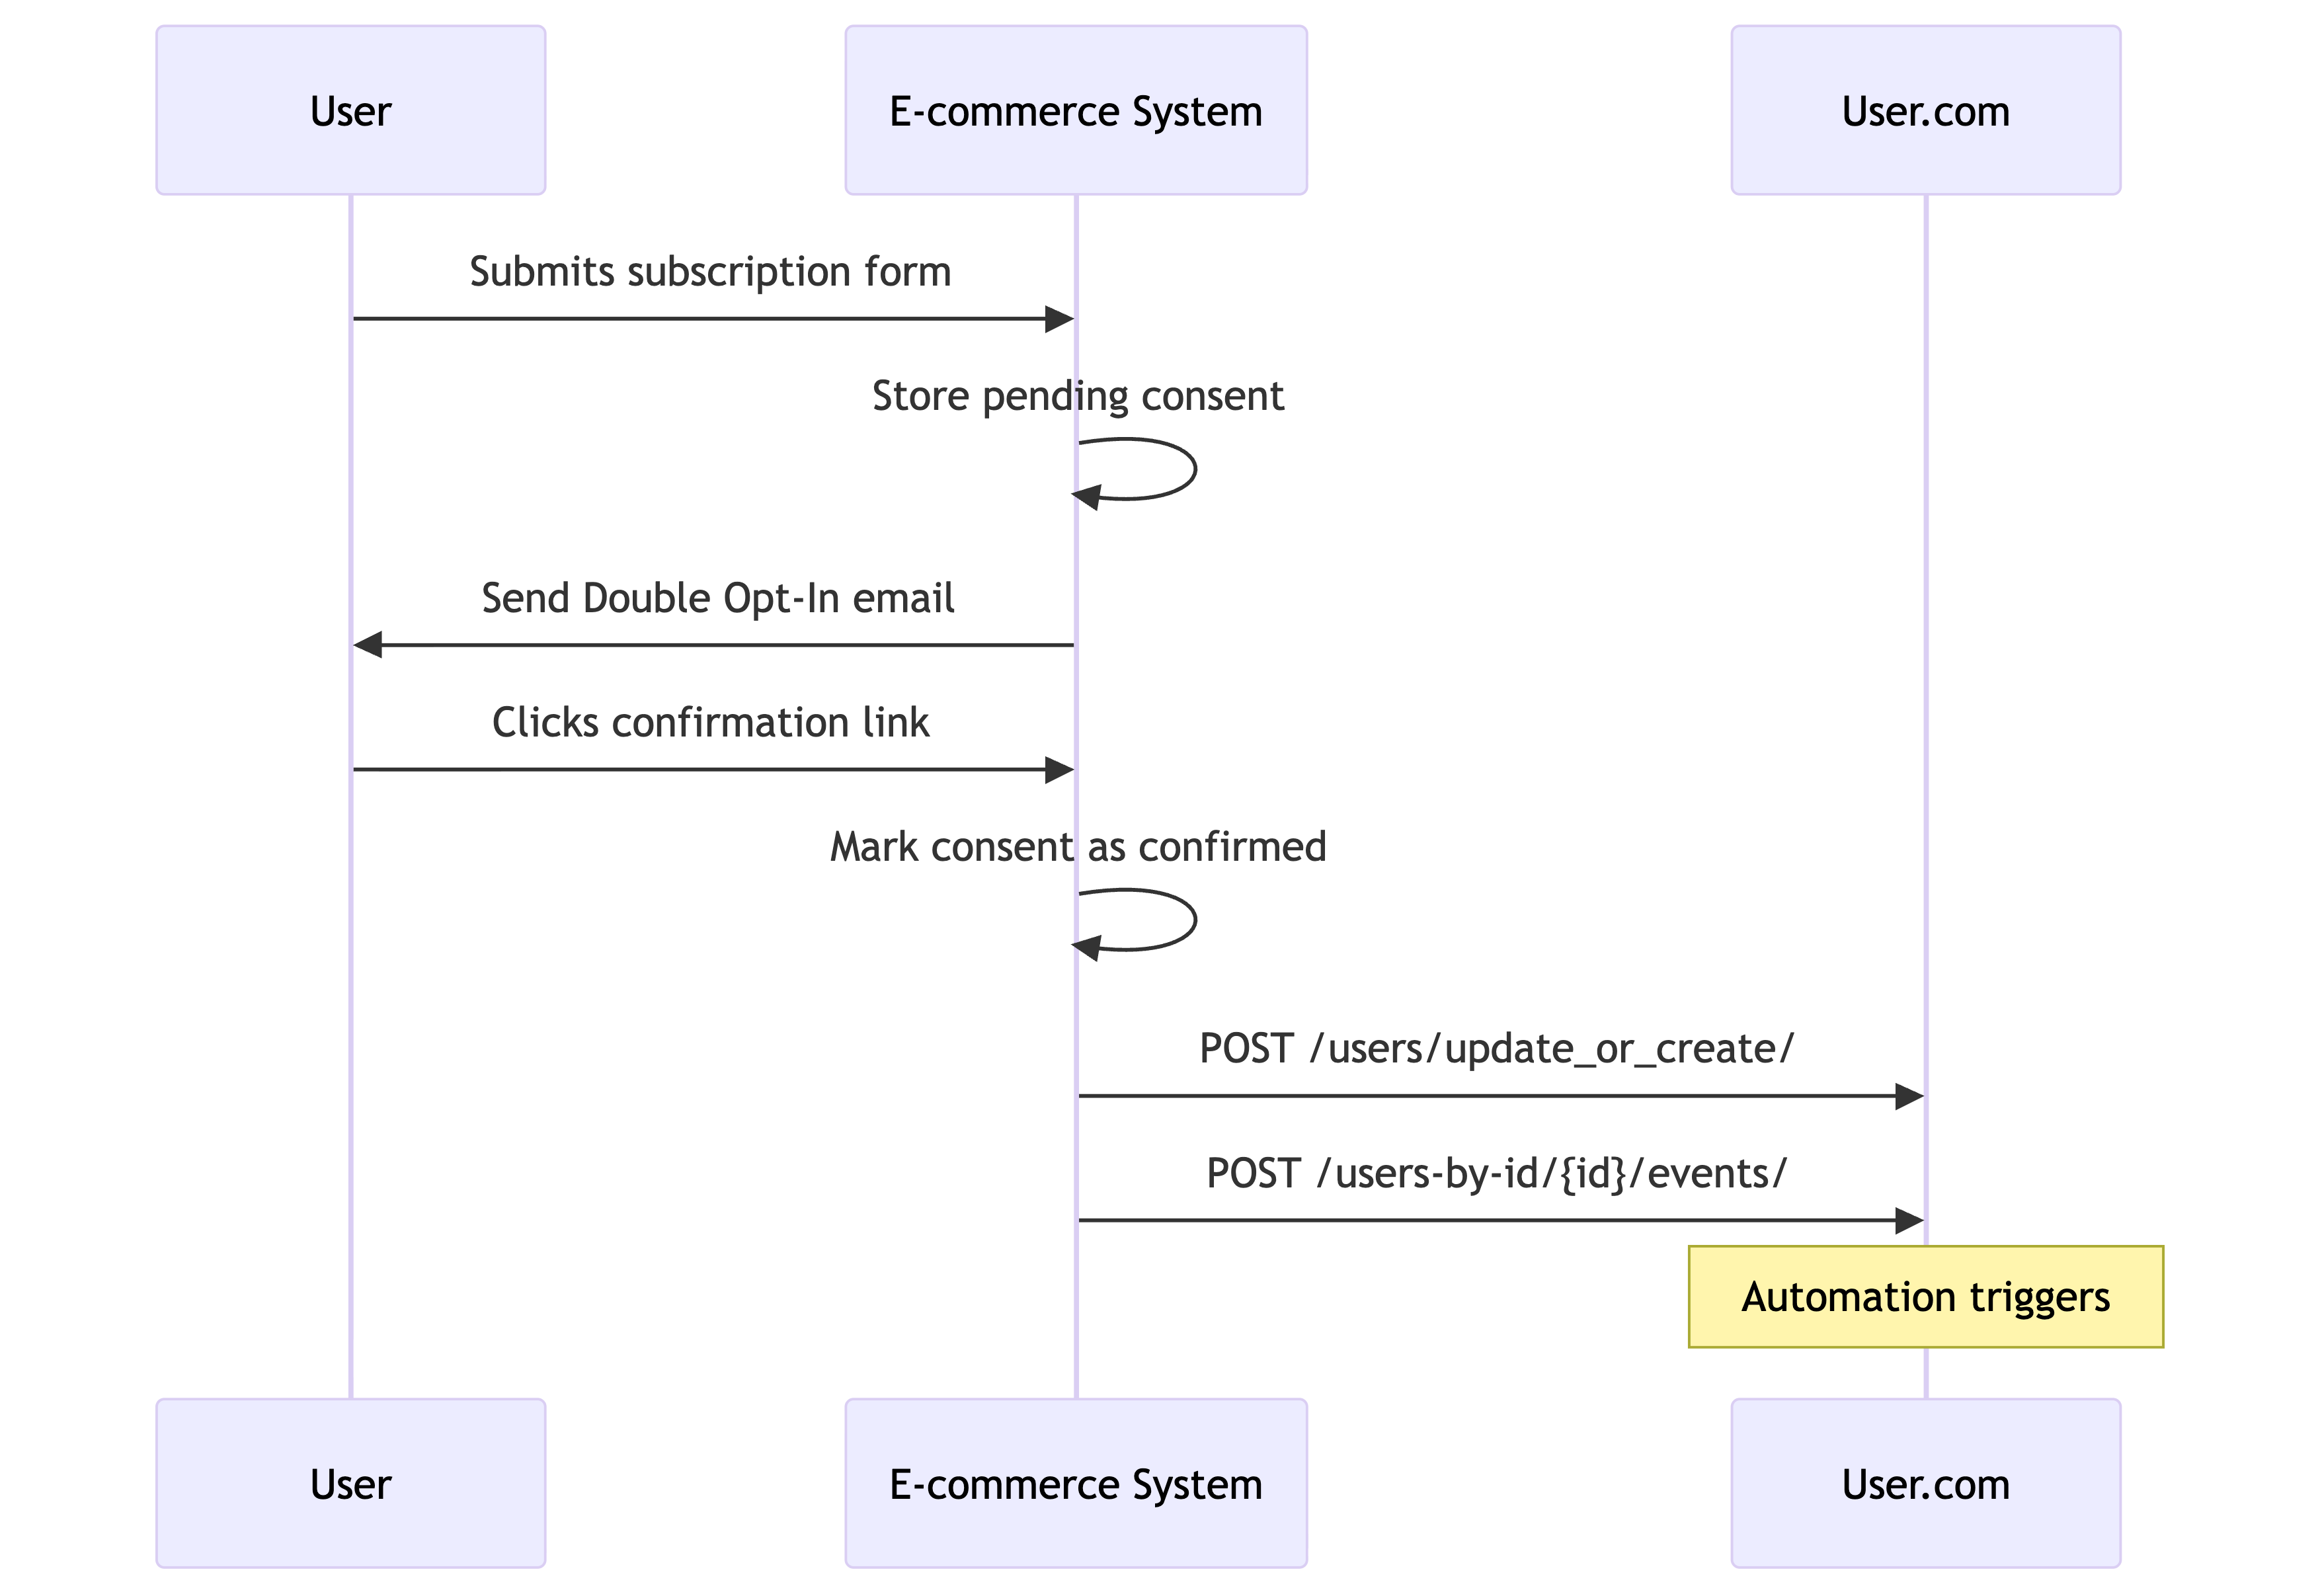
E-commerce managed Double Opt-In
Choose this if: Your platform already sends Double Opt-In emails and tracks confirmations.
- Contact submits subscription form
- Your system sends Double Opt-In confirmation email
- Contact confirms subscription via email link
- Your system syncs confirmed consent to User.com (contact update + event)
User.com receives only confirmed, verified consents. Automations trigger on the consent event.
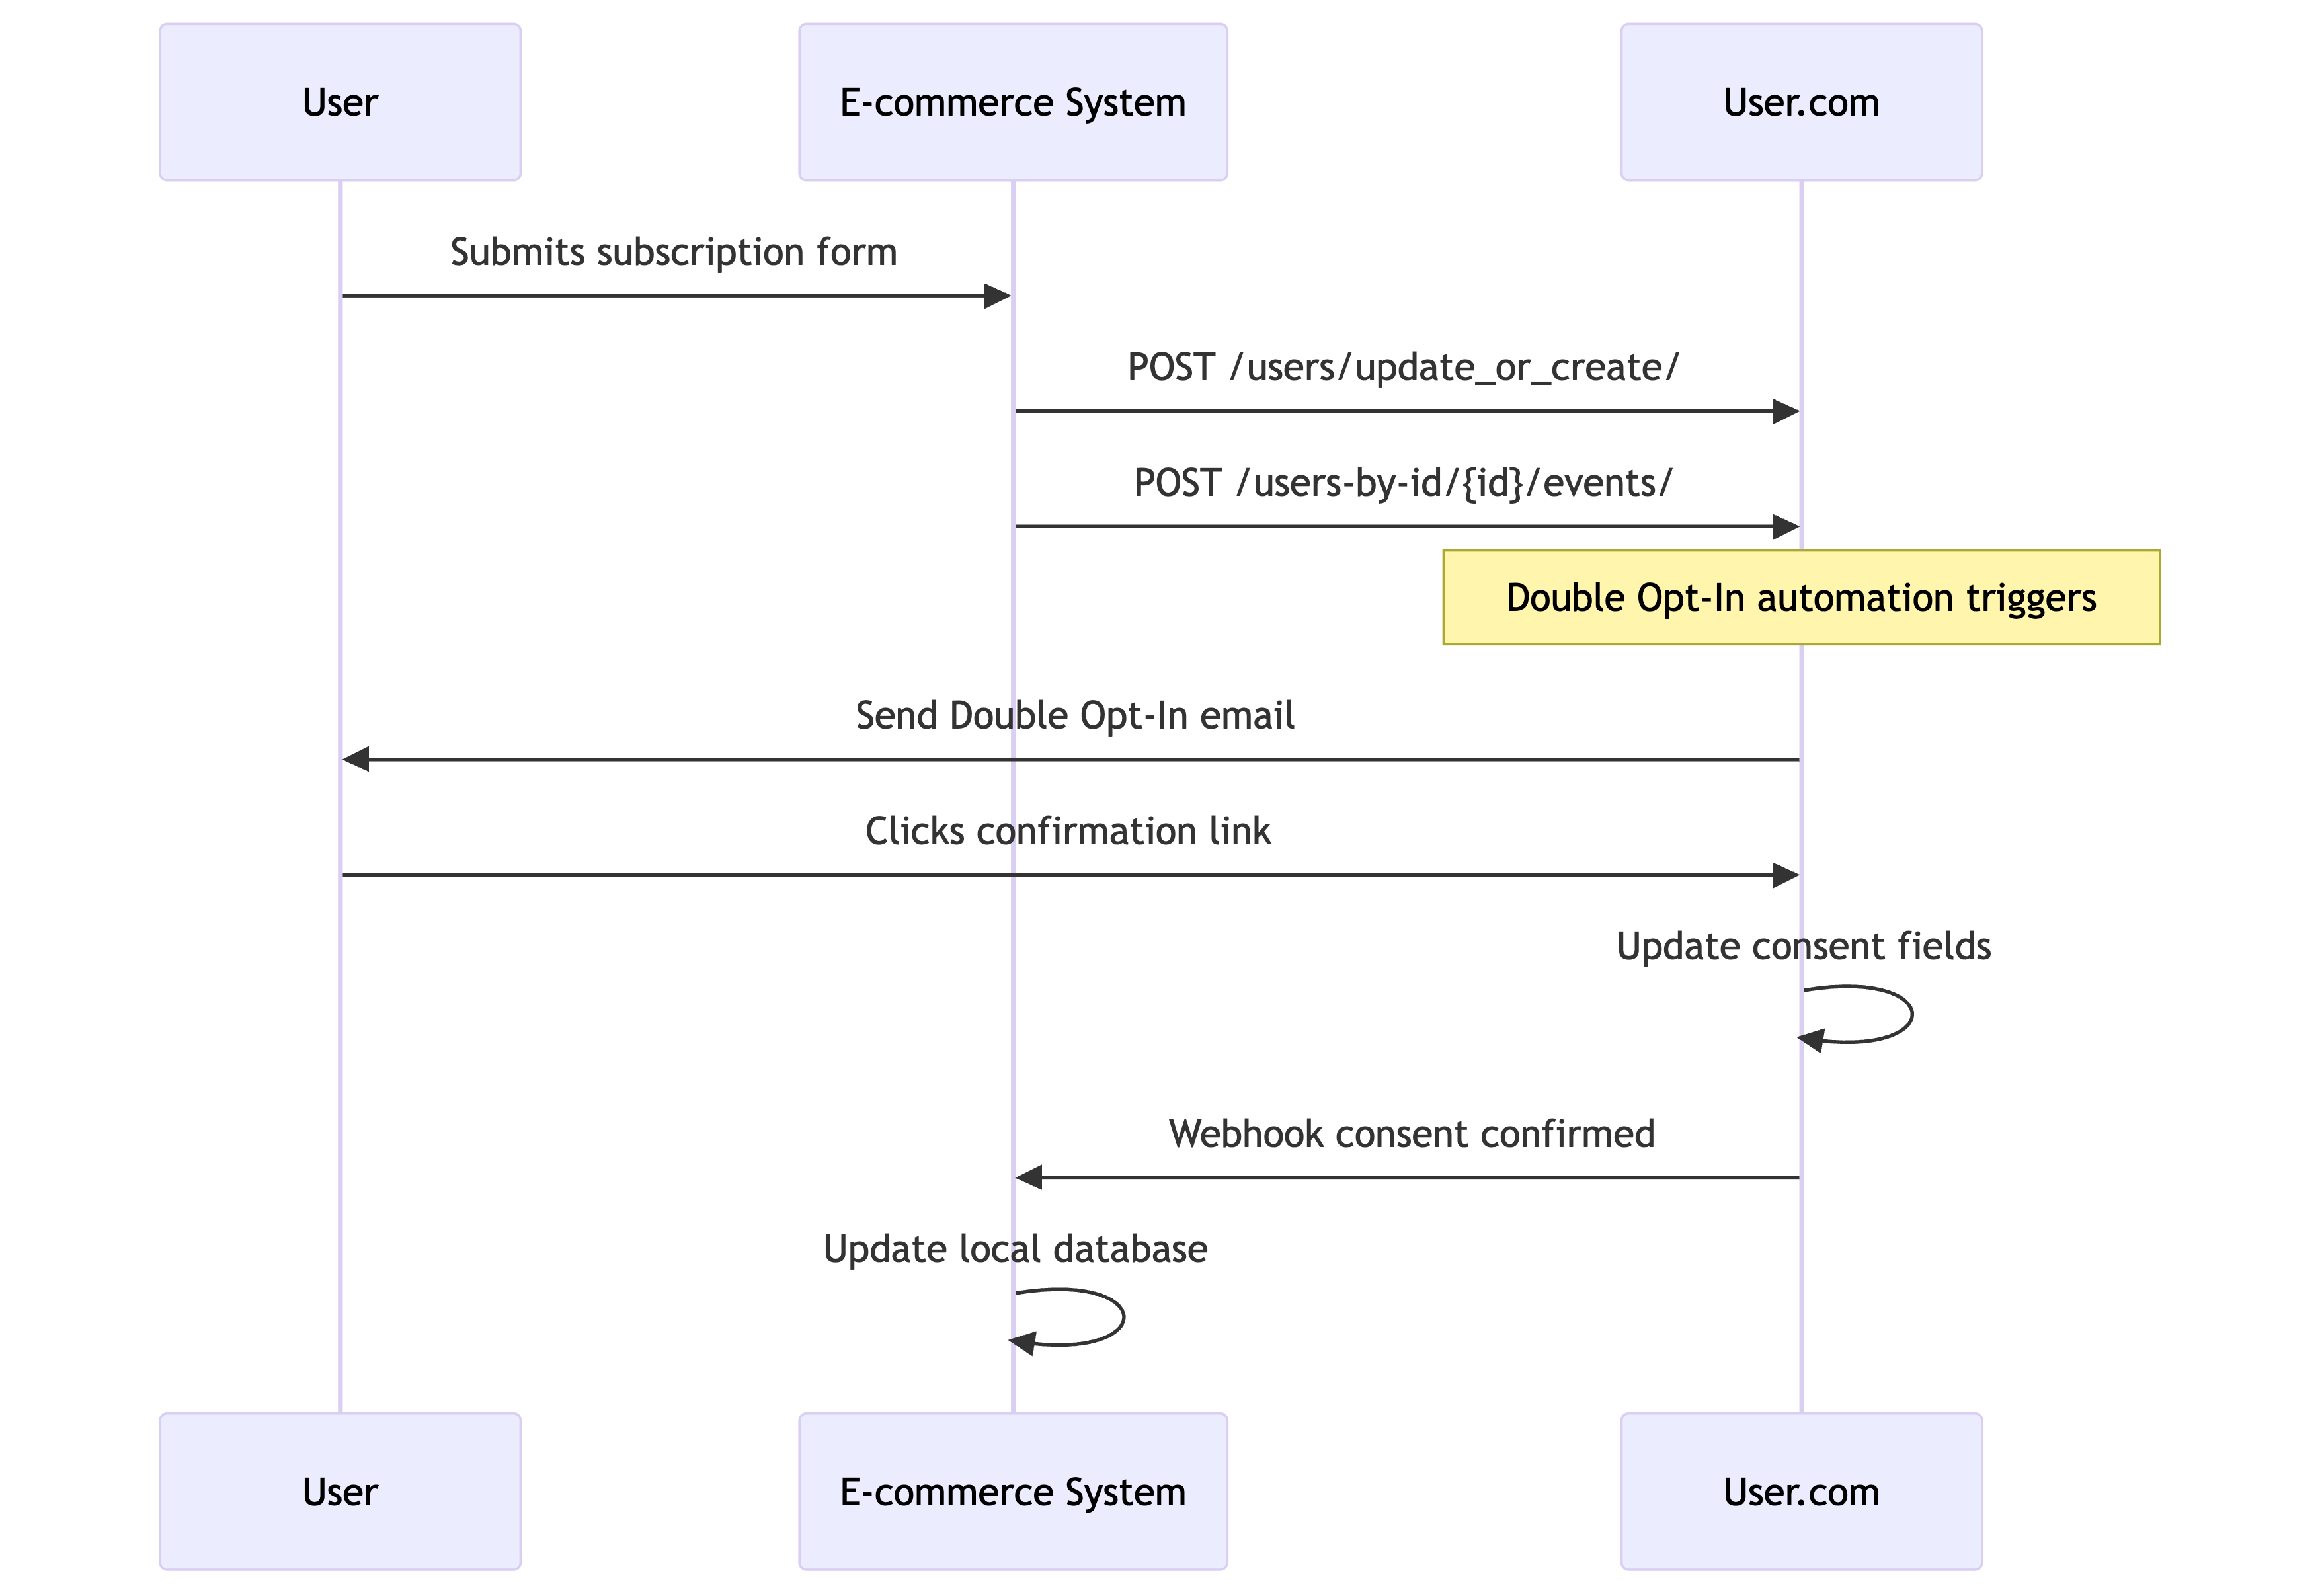
User.com managed Double Opt-In
Choose this if: You want User.com to handle the entire Double Opt-In flow.
- Contact submits subscription form
- Your system sends initial opt-in request to User.com (contact update + event)
- User.com automation sends Double Opt-In confirmation email
- Contact confirms subscription via email link
- User.com updates consent status and triggers webhook to your system
Your system receives only confirmed consents via reverse sync.
Implementation: E-commerce to User.com
Every consent change requires two API calls: one to update contact attributes, one to fire an event for automations. The implementation depends on whether the consent is already verified or requires Double Opt-In confirmation.
Verified consents (direct or e-commerce confirmed)
Use this pattern when consent is already verified—either because the contact is authenticated (direct consent) or because your system already completed Double Opt-In confirmation (e-commerce managed).
This applies to:
- Direct consents — Account settings, checkout (when appropriate), authenticated contacts
- E-commerce managed Double Opt-In — After your system confirms the subscription
Step 1: Update contact with confirmed consent
curl -X POST "https://<your_app_subdomain>.user.com/api/public/users/update_or_create/" \
  -H "Authorization: Token <your_64_char_api_key>" \
  -H "Accept: */*; version=2" \
  -H "Content-Type: application/json" \
  -d '{
    "custom_id": "john@example.com",
    "email": "john@example.com",
    "email_consent": true,
    "sms_consent": false
  }'
The custom_id is the contact's lowercase email address. See Key decisions → Decide on User ID for the recommended identification strategy.
Response: 200 OK with contact ID
Step 2: Create consent event
curl -X POST "https://<your_app_subdomain>.user.com/api/public/users-by-id/john@example.com/events/" \
  -H "Authorization: Token <your_64_char_api_key>" \
  -H "Accept: */*; version=2" \
  -H "Content-Type: application/json" \
  -d '{
    "name": "consent_granted",
    "data": {
      "email_consent": true,
      "sms_consent": false,
      "source": "account_settings"
    }
  }'
Response: 201 Created with event ID
The consent is already verified, so User.com automations trigger immediately.
Unverified consents (User.com managed Double Opt-In)
Use this pattern when consent requires verification via Double Opt-In handled by User.com. Send the initial opt-in request without setting consent fields—User.com will update them after confirmation.
Step 1: Create or update contact (without consent fields)
curl -X POST "https://<your_app_subdomain>.user.com/api/public/users/update_or_create/" \
  -H "Authorization: Token <your_64_char_api_key>" \
  -H "Accept: */*; version=2" \
  -H "Content-Type: application/json" \
  -d '{
    "custom_id": "john@example.com",
    "email": "john@example.com",
    "first_name": "John"
  }'
Response: 200 OK with contact ID
Step 2: Create consent request event
curl -X POST "https://<your_app_subdomain>.user.com/api/public/users-by-id/john@example.com/events/" \
  -H "Authorization: Token <your_64_char_api_key>" \
  -H "Accept: */*; version=2" \
  -H "Content-Type: application/json" \
  -d '{
    "name": "consent_requested",
    "data": {
      "requested_email_consent": true,
      "requested_sms_consent": false,
      "source": "registration_form"
    }
  }'
Response: 201 Created with event ID
This event triggers a User.com automation that sends the Double Opt-In email. When the contact confirms, User.com updates the consent fields and triggers a webhook back to your system (see reverse sync).
Implementation: User.com to e-commerce (reverse sync)
Consent changes originating in User.com need to sync back:
- Unsubscribe links in emails
- Pop-up opt-in forms
- Custom consent management forms
What you need to build
To receive consent updates from User.com, you need to create an API endpoint on your server that can accept HTTP requests. User.com will call this endpoint whenever a consent change occurs.
This is your responsibility to implement—User.com provides the mechanism to send data, but you build the receiver.
How User.com sends webhooks
User.com sends webhooks via the API Call automation module. When an automation triggers (e.g., contact clicks unsubscribe link), it sends an HTTP request to your endpoint.
The payload structure is fixed:
{
  "path": 12345,
  "timestamp": "2025-06-23T12:50:52.455845+00:00",
  "extra": { ... }
}
path— The automation ID as an integer (set automatically)timestamp— ISO 8601 datetime when the webhook was sent (set automatically)extra— You configure this in the automation to include the data you need
Configuring the Send API Call module
In your User.com automation:
- Add the Send API Call module
- Configure the request:
- Method:
POST - URL: Your endpoint (e.g.,
https://api.yourstore.com/webhooks/usercom/consent) - Headers: Add authentication (e.g.,
X-Webhook-Secret: your_secret_key) - Body: Configure the
extraobject with contact data
- Method:
Example extra configuration (using User.com template variables):
{
  "user_custom_id": "{{ user.custom_id }}",
  "email": "{{ user.email }}",
  "email_consent": "{{ user.email_consent }}",
  "sms_consent": "{{ user.sms_consent }}",
  "change_reason": "unsubscribe_link"
}
Resulting webhook payload your endpoint receives:
{
  "path": 12345,
  "timestamp": "2025-06-23T12:50:52.455845+00:00",
  "extra": {
    "user_custom_id": "john@example.com",
    "email": "john@example.com",
    "email_consent": false,
    "sms_consent": true,
    "change_reason": "unsubscribe_link"
  }
}
Building your endpoint
Your endpoint needs to:
- Accept POST requests with JSON body
- Validate the request — Check authentication headers to ensure it's from User.com
- Parse the payload — Extract data from the
extraobject - Update your database — Apply the consent changes to your system
- Return 200 OK — Confirm successful processing
Example endpoint logic (pseudocode):
def handle_usercom_webhook(request):
    # Validate authentication
    if request.headers.get('X-Webhook-Secret') != 'your_secret_key':
        return Response(status=401)

    # Parse payload
    data = request.json
    user_id = data['extra']['user_custom_id']
    email_consent = data['extra']['email_consent']

    # Update your database
    update_user_consent(user_id, email_consent=email_consent)

    # Confirm success
    return Response(status=200)
Middleware alternative
If building a custom endpoint isn't feasible, use a middleware service like Make.com:
- Create a Make.com scenario with a webhook trigger
- User.com sends to Make.com instead of your server directly
- Make.com transforms the data and calls your existing APIs
Benefits:
- No custom endpoint development required
- Built-in error handling and retries
- Visual workflow builder for data transformation
- Can integrate with systems that don't accept custom webhooks
Handling unsubscribes
Unsubscribes are consent changes, so they follow the same patterns described above. The key decision is which system owns the unsubscribe links in your emails.
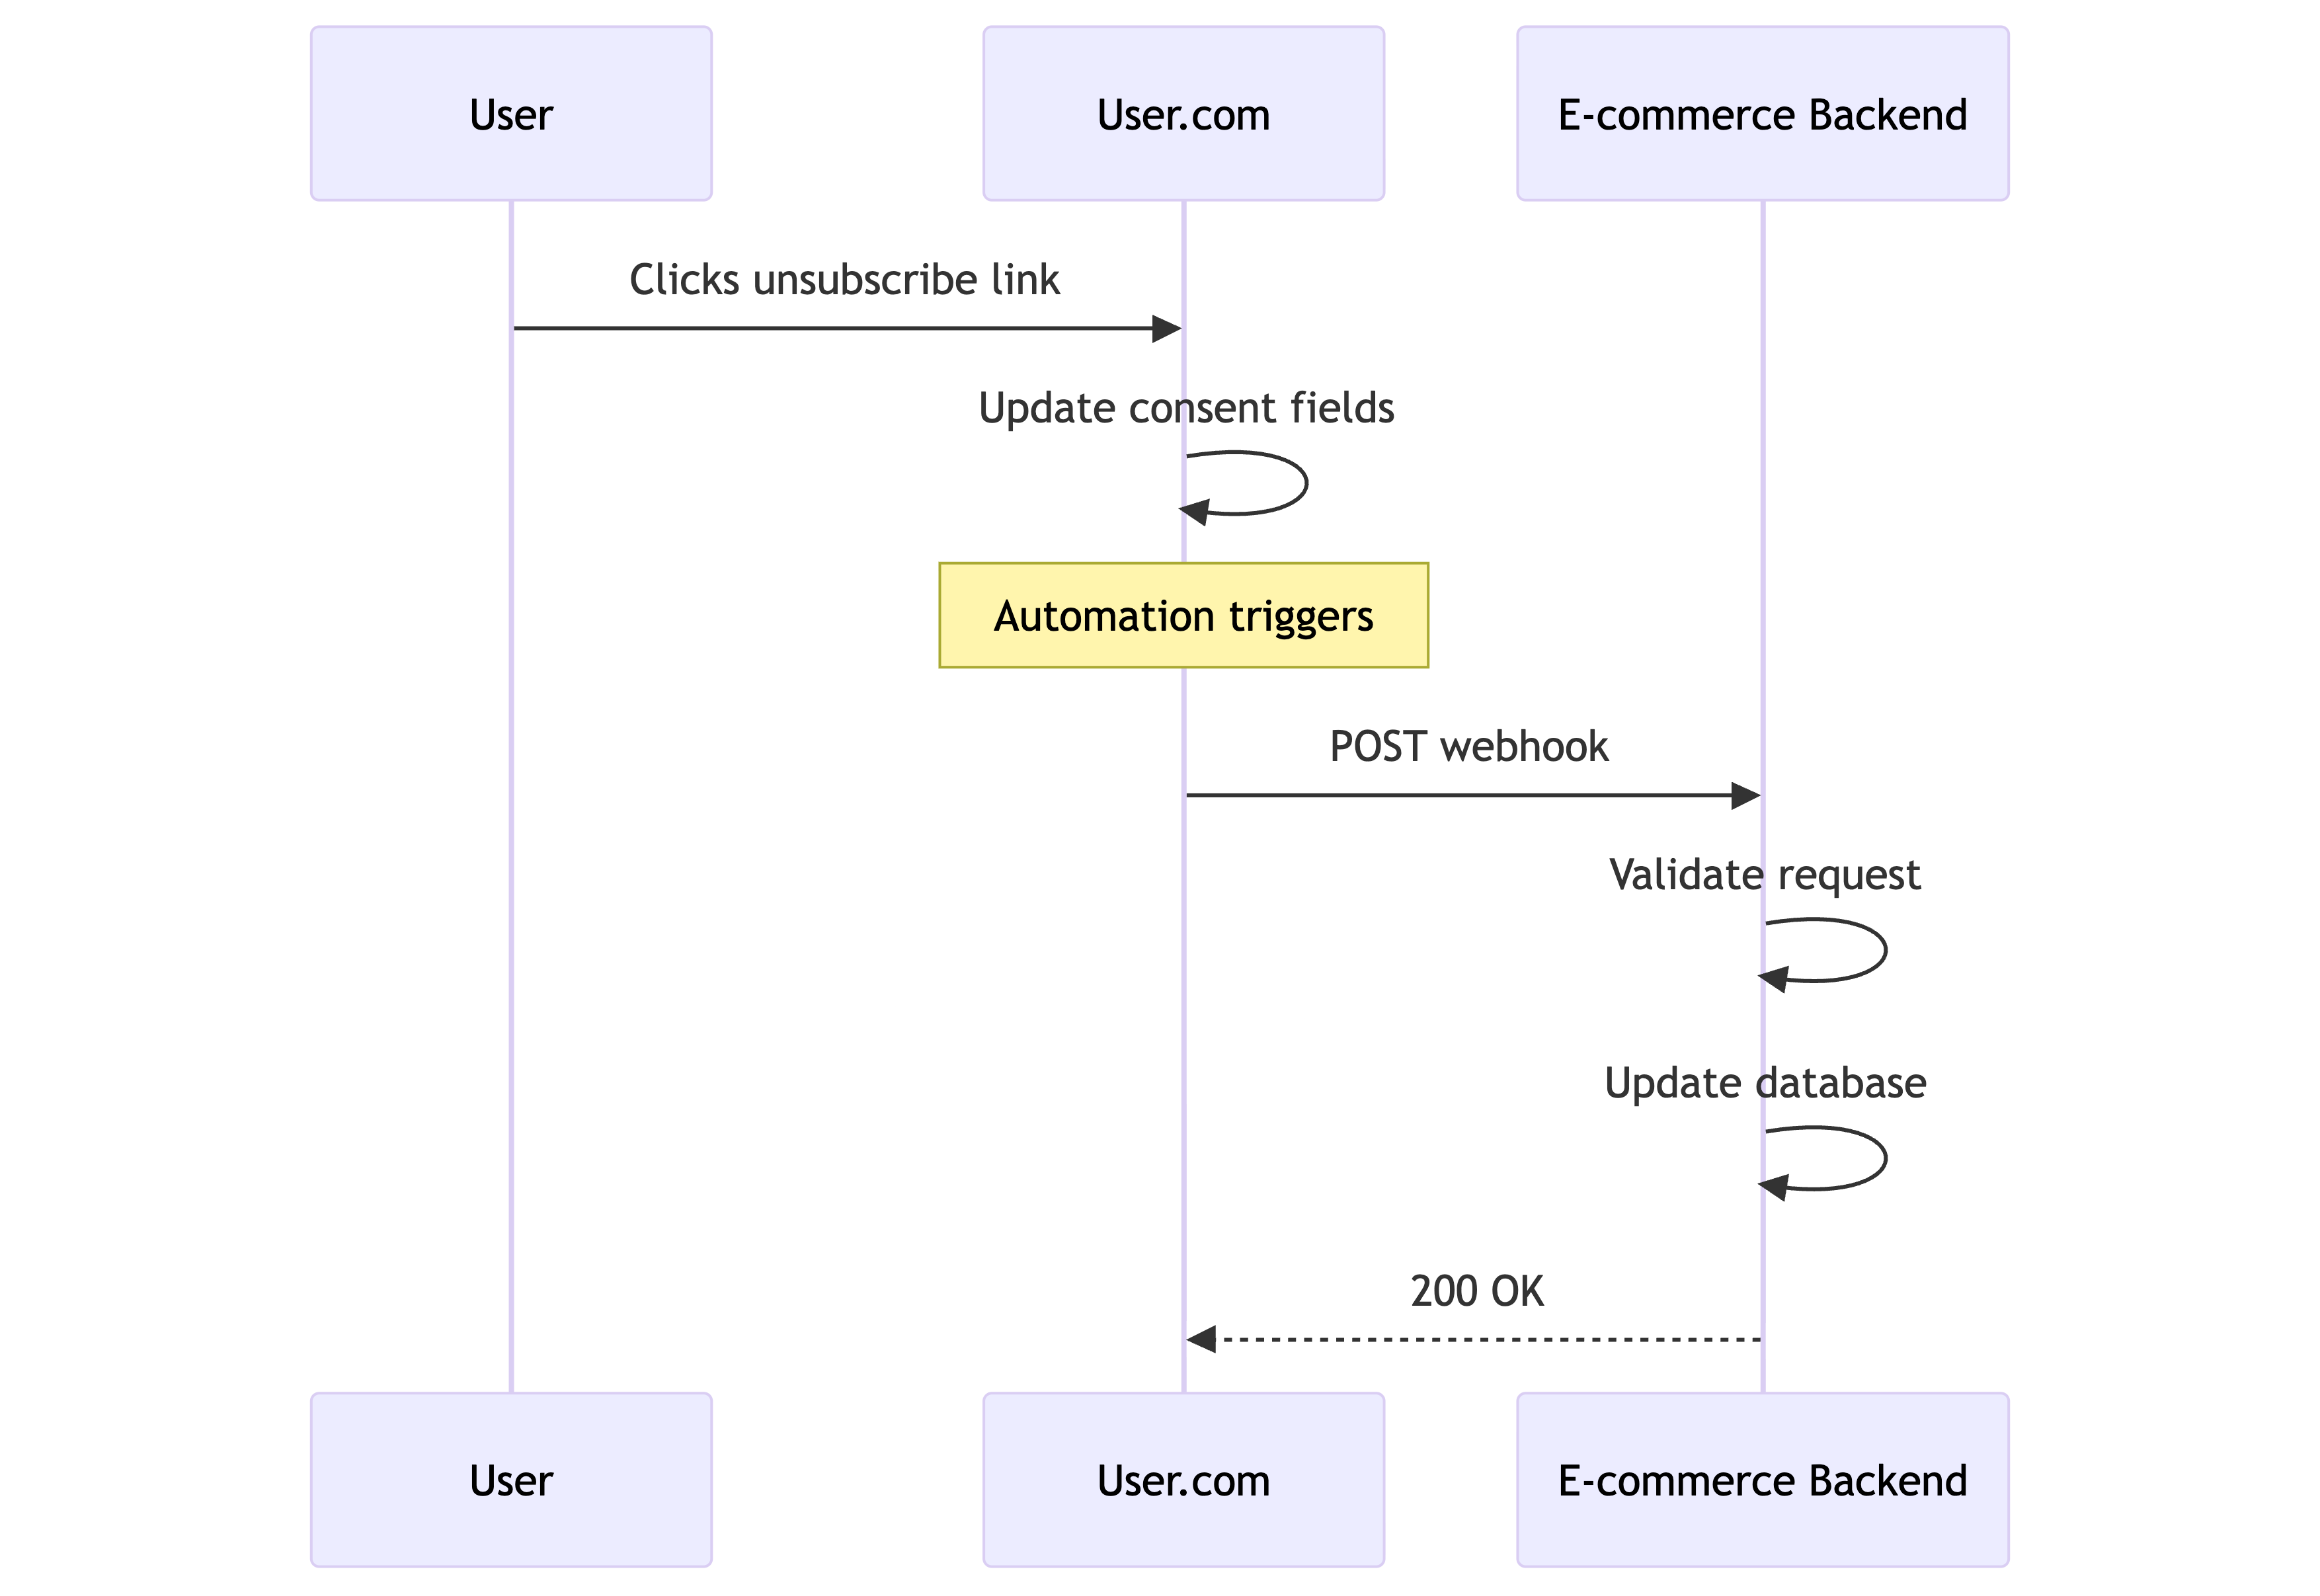
Option 1: User.com unsubscribe links (default)
When to use: You're sending emails through User.com and using User.com's built-in unsubscribe links.
Flow:
- Contact clicks unsubscribe link in User.com email
- User.com updates the contact's consent status
- Your reverse sync integration receives the change and updates your e-commerce database
What you need: Implement the User.com to e-commerce reverse sync to receive unsubscribe notifications.
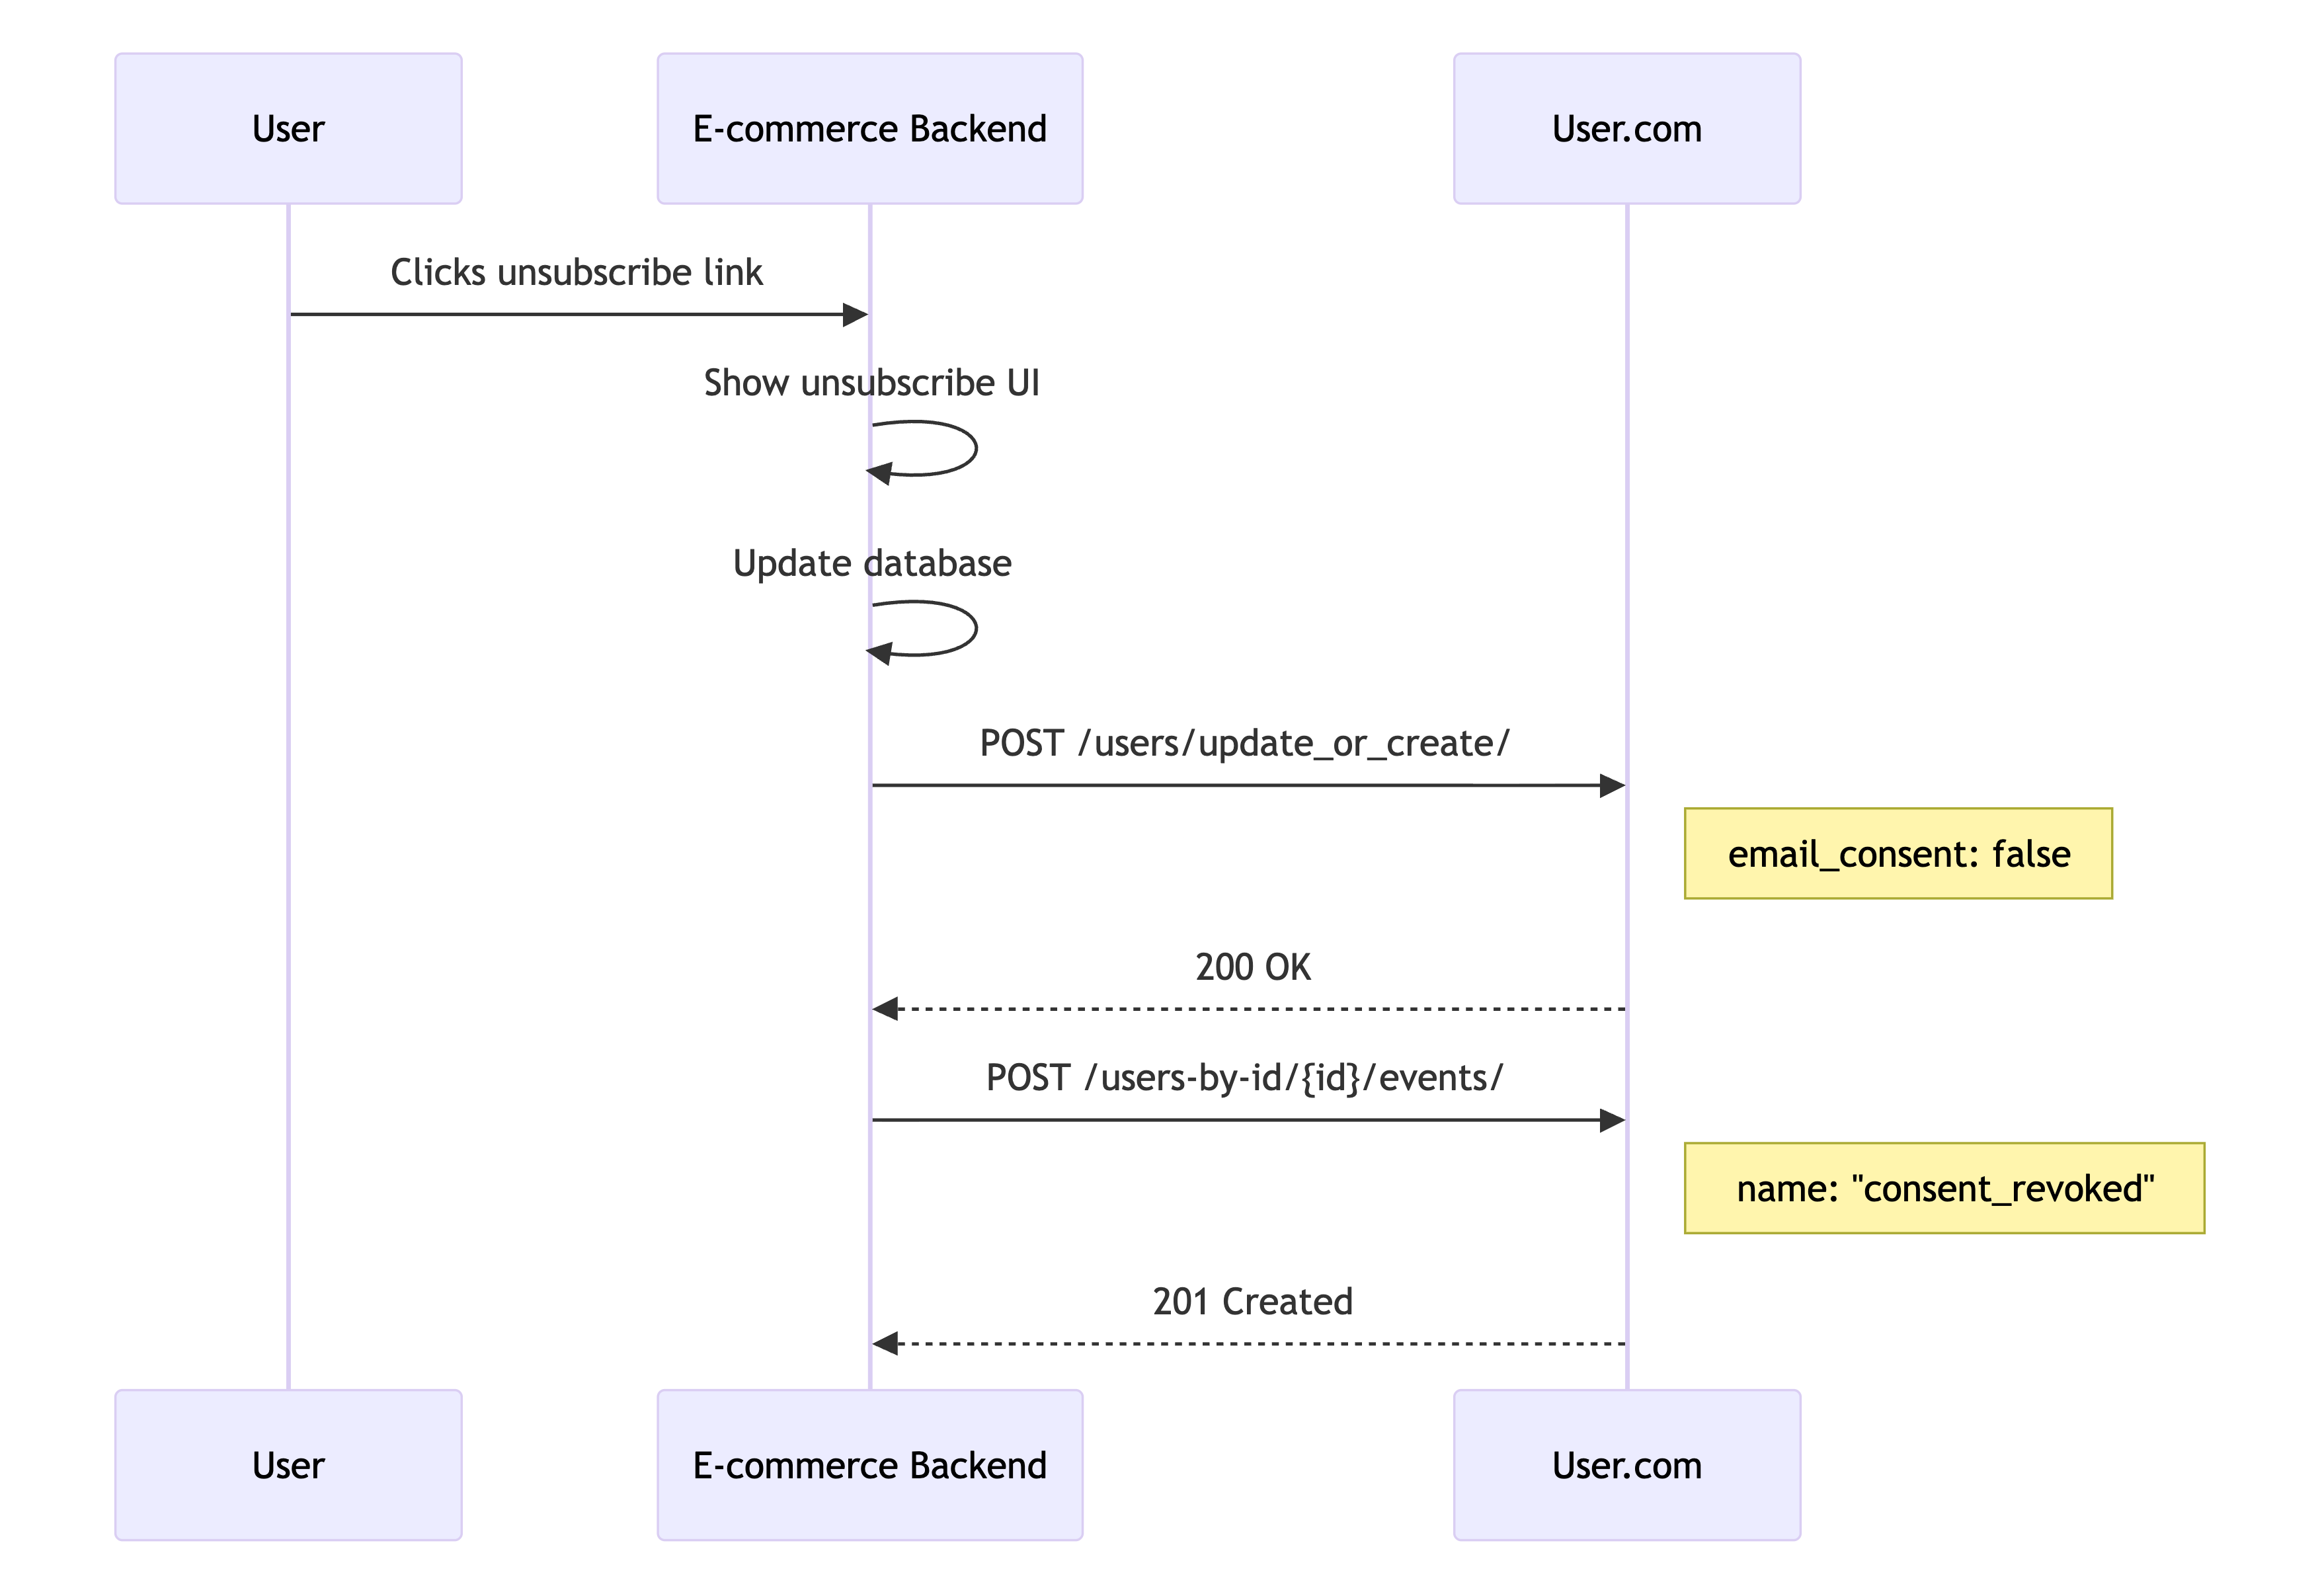
Option 2: Your own unsubscribe links
When to use: You want full control over the unsubscribe experience, or you're using your own email infrastructure alongside User.com.
Flow:
- Contact clicks unsubscribe link pointing to your system
- Your system handles the unsubscribe entirely (UI, confirmation, database update)
- Your system notifies User.com using the standard e-commerce to User.com consent change pattern
What you need: Your existing consent sync implementation handles this automatically—unsubscribes are just consent changes with email_consent: false.
Verification
Test your implementation thoroughly:
- Contact updates: Check User.com contact profiles show correct consent values
- Event timeline: Verify consent events appear with correct data
- Automation triggers: Test that consent events fire expected automations
- Reverse sync: Confirm User.com consent changes reach your system
- Double Opt-In flow: Complete end-to-end testing of opt-in → confirmation → sync
Network monitoring: Filter requests for /users/update_or_create/ and /events/ — expect 200 OK responses.
Next steps
With marketing consents implemented, proceed to order tracking:
- Order tracking — Authoritative purchase data for revenue attribution